


How to Start a Planner: A Beginner’s Guide to Planning Your Life
Starting a planner can feel like a fresh beginning. A place to organize everything that is taking up space in your mind, make your priorities visible, and create a little more intention around how you spend your days.
But if you are new to planning, opening a completely blank planner can also feel surprisingly overwhelming.
What are you supposed to write first? Do you need a monthly, weekly, and daily planner? How do you organize your sections? And, perhaps most importantly, how do you create a planning routine that you will actually keep?
The good news is that your planner does not need to be complicated to be effective.
Here is how to start a planner for beginners, step by step.
1. Decide What You Want Your Planner to Do
Before choosing layouts, dividers, or accessories, start with a simple question:
What do I want my planner to help me manage?
Your answer will determine the planning system that works best for you.
You might use your planner to:
-
Organize your work schedule
-
Keep track of appointments and important dates
-
Manage your personal to-do list
-
Plan projects
-
Track habits and routines
-
Manage your finances
-
Plan meals
-
Organize content or your business
-
Set and track goals
-
Create more structure in your everyday life
You do not need to plan every area of your life at once. In fact, one of the easiest ways to start a planner is to choose two or three things you want it to help you manage.
Your planning system can evolve with you.
2. Choose the Right Planner Size
The best planner is one that fits naturally into your life.
If you want something portable, a smaller planner may make sense. If you primarily plan at your desk and like having more room to write, you may prefer a larger format.
At The Line, our planner inserts are available in multiple sizes, including A5, A5 Slim, Personal, Personal Wide, and Half Letter, allowing you to build a planning system around the way you actually plan.
A ring agenda can be especially useful for beginners because your planner is not fixed. You can add, remove, rearrange, and replace pages as your planning needs change.
Instead of adapting your life to your planner, you can adapt your planner to your life.
3. Start With Three Essential Planner Sections
It can be tempting to fill a new planner with every insert imaginable.
Start simpler.
For most beginners, three planning views create a strong foundation:
Monthly Planner
Your monthly planner gives you the big picture.
Use it for:
-
Appointments
-
Birthdays
-
Travel
-
Events
-
Important deadlines
-
Bill due dates
-
Major projects
-
Monthly goals
At the beginning of each month, add anything that already has a specific date attached to it.
This becomes the foundation for everything you plan afterward.
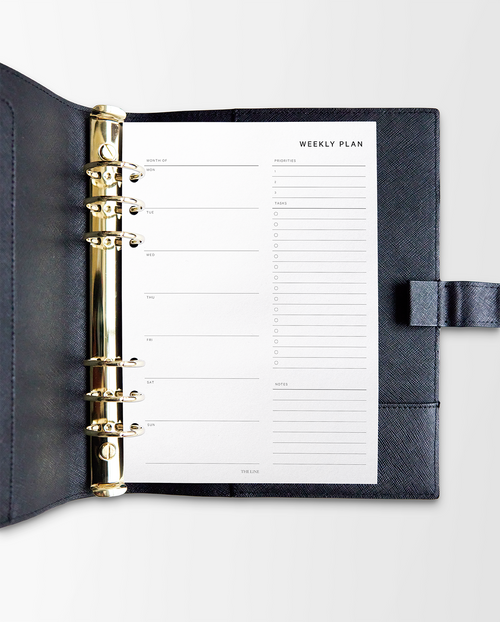
Weekly Planner
Your weekly planner helps turn your bigger plans into something actionable.
Use your weekly pages for:
-
Weekly priorities
-
Meetings
-
Workouts
-
Errands
-
Appointments
-
To-do lists
-
Meal planning
-
Personal commitments
Seeing the entire week at once can help you understand not only what needs to get done, but when you realistically have space to do it.
Daily Planner
If your days are particularly busy or you prefer more detailed planning, daily planner inserts can give you more room to organize your schedule.
You might include:
-
Your top three priorities
-
Appointments
-
Time blocks
-
Tasks
-
Notes
-
Meals
-
Habits
-
A daily intention
You do not necessarily need all three layouts. Some people thrive with only a weekly planner. Others prefer the detail of daily pages.
Start with what feels useful rather than what you think a planner is supposed to contain.
4. Add Your Important Dates First
Now it is time to actually start writing.
Begin with information you already know.
Add birthdays, appointments, travel, work deadlines, events, anniversaries, school dates, launches, and anything else already scheduled.
Start with your yearly or monthly overview before transferring relevant information into your weekly pages.
Think of planning as moving from the big picture to the details:
Year → Month → Week → Day
This creates context before you begin filling your planner with tasks.
5. Create a Master To-Do List
One of the most useful things you can keep in your planner is a place to capture everything that is currently on your mind.
Write down the things you need to do, remember, research, buy, book, or follow up on.
Do not worry about organizing everything immediately.
This is sometimes called a brain dump.
Once everything is on paper, decide:
What needs to happen this month?
Then:What needs to happen this week?
Then:What actually needs to happen today?
Instead of carrying an endless mental to-do list, your planner becomes a trusted place to keep it.
6. Choose Your Priorities
A planner should not simply document everything you could possibly do.
It should help you decide what matters.
At the beginning of each week, choose a few priorities.
Ask yourself:
If I completed only three things this week, what would make the biggest difference?
Then use your planner to protect time for those priorities.
You can use the same approach each morning by identifying your most important tasks for the day.
Planning becomes much more useful when it helps you make decisions, rather than simply creating longer lists.
7. Create a Weekly Planning Routine
Consistency is one of the most important parts of learning how to use a planner.
Choose one day each week for a weekly reset.
Sunday works beautifully for many people because it creates a natural transition into the week ahead, but your planning day can be whenever works for your schedule.
During your weekly planning routine:
Review the previous week.
Move forward anything that still needs your attention.
Check your monthly calendar for upcoming appointments and deadlines.
Write down your priorities for the week.
Add your tasks.
Schedule anything that requires dedicated time.
Then look at your week as a whole.
Does it feel realistic?
Planning is not about fitting as much as possible into seven days. It is about being intentional with the time you actually have.
8. Leave White Space
One of the most overlooked planner tips for beginners is to leave room for life to happen.
Not every hour needs to be scheduled.
Not every line needs to be filled.
And not every unfinished task needs to immediately move to tomorrow.
White space gives you flexibility when meetings run long, plans change, something unexpected comes up, or you simply need rest.
A beautiful planning system should create clarity, not another source of pressure.
9. Make Your Planner Somewhere You Want to Return To
Your planner is practical, but it can also be personal.
Use dashboards, dividers, notes, photographs, quotes, or other details that make opening your planner feel like a small ritual.
Keep it somewhere visible.
Pair your planning session with your morning coffee or your Sunday evening routine.
The goal is not to create perfect planner pages.
The goal is to create a system you enjoy returning to.
10. Let Your Planning System Evolve
Your first planner setup does not have to be your forever setup.
You may discover that you need more room for weekly planning and less for daily planning. You may want to add a budget section. A new job might require project planning pages. A busy season might call for daily scheduling.
That is the beauty of a customizable planner.
It can change as your life changes.
Start with the essentials, pay attention to what you actually use, and build from there.
Start With What Matters
If you are wondering how to start a planner, remember that the best planning system is not necessarily the most detailed one.
It is the one you will use.
Start with your important dates. Add your priorities. Plan your week. Give yourself room to adjust.
Over time, those small moments spent planning can become something bigger: a way of being more intentional about where your time goes and what you are making room for.
Because a planner is not simply a place to organize what you have to do.
It is a place to make room for the life you want.
Ready to create your own planning system? Explore The Line's planner inserts and build a planner designed around the way you live.